Page 6 of 7 FirstFirst ... 4567 LastLast
Results 126 to 150 of 159

Thread: DIY Adjustable rear camber arms

  1. #126
    Moderator
    Join Date
    Aug 2012
    Location
    SoCalif
    Posts
    1,011
    Quote Originally Posted by 202brabus View Post
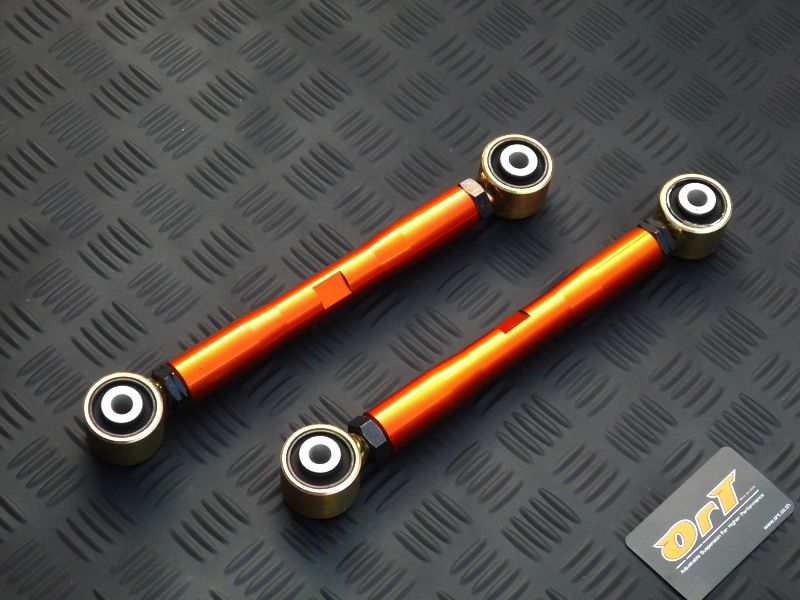
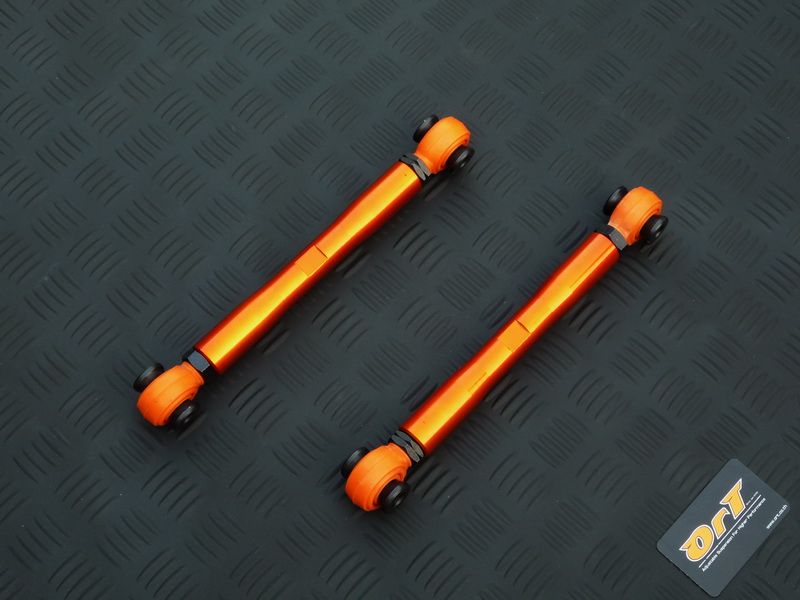
    Been done already, check these out by Ake rt.


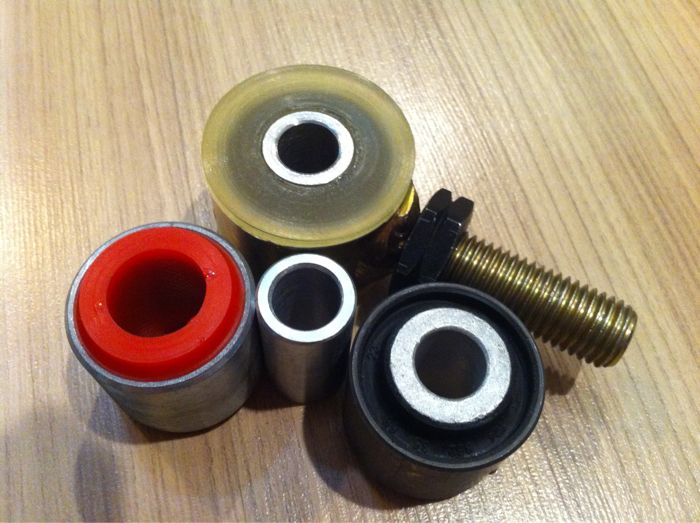
    Bushing types:
    - Normal bush = Mercedes OEM bush
    - 85A light yellow Polyurethane Bush
    - Ball bearing rod end: with maintenance or teflon liner (maintenance free)

    Are you seriously that big of an idiot? Comparing some cheap ass Bangkok made platic bushing crap to a QA1 rod end suspension pivot? Moderators- it's this asshole or me- it's seriously gonna come down to that. Take it or leave it. This asswipe keeps posting like he does and I am gone from here.

  2. #127
    Moderator
    Join Date
    Aug 2012
    Location
    SoCalif
    Posts
    1,011
    The rest of my camber link parts came in. The top one is completely assembled, the bottom I pulled one of the step inserts out so you can see how it fits into the 3/4" rod end and steps the ID down to 1/2". It is 1 3/8" wide with both step washers inside it just like the mounting width on the rear subframe. The left side is the side that attaches to the upright. you can see the tapered washers that will set against the rod end and the bolt will go through- these allow for swivel movement of the rodend so as not to bind or press agains the swivel ball when the bolt is tightened. THey also allow a bit of safety since the upright mount side is only single shear (the chassis side is double shear mount so nothing can "slip off one side or the other " if a rodend were to somehow catisthopically fail. The hardened taper washers would prevent a complete failure and detachment. (wink) No one in the aftermarket industry is savoy enough to think of this (generally a lack of experience in what product they are trying to simply make a buck selling)

    The left side rod end is a 3/4" shank and a 5/8" bore. Those Meziere taper washers are 1/2" bore. What you are not seeing is the 5/8" to 1/2" sleeve inserts I have in there to reduce the rod end bore down to the 1/2" bolt size I need. I bought those from Moore Porducts here in So Calif.- they are only about $1.50 each.
    Attachment 1471

    It doesn't get any better than this. These are WAAAYYYY stronger than MB arts camber arms, and just as light weight plus much more safe design.

  3. #128
    Moderator
    Join Date
    Aug 2012
    Location
    SoCalif
    Posts
    1,011
    I just installed mine this morning- finally had a few hours to mess with it. I used 2 1/2" long bolts on the chassis side with one fender washer inserted with the rod end assembly inside the inboard mount tabs. Gap was barely wider (my assembly was 1 3/8" wide and the mount is 1 7/16", so a standard aprox 3/32 thick fender washer too up the little gap just on one side. These reducer inserts I used into the 3/4" bore rodend to reduce to 1/2" have nice sized shoulder on them already to force against the mount walls- so the fender washer is not needed on both siade for any type of reinforcement, just gap filling.

    The tricky part- had to drop the 4 rear suspension subframe mounts and lower the rear subframe about 4 " in order to get a cordless drill up into there and bore out the inboard mount holes from 12mm to 13mm(1/2"). New grade8 bolt, 1/2" x 2 1/2" long, a few standard washers on each outer sides, and I grade 8 nylock nut to hold it all in place.

    Now the outboard mount: With the OEM camber arm removed, the OEM insert sleeve goes out with it so the bore on the knuckle is already 13mm (1/2") even thought a 10mm (aprox 3/8") bolt is used OEM. I used the same length bolt in 1/2" as OEM, 3 inches long (only because the industrial warehouse I shop at was out of 2 3/4" long.) I had to insert a few fender washers on each side of the Meziere taper safety whasers to take up length of the bolt prior to insertion into the upright so as not to have the bolt stick through too long and make contact with the forward upper link arm.

    As for length of the arms I built, I could have gone a 1/2" shorter but they worked fine. When I finiehd installing them, the shortest position was about 1/8" longer than the OEM arms, yet they would extend about 2" longer- so buying arms 1/2" shorter than what I did would be best. Mine still have adequate street adjustment (this will never be a track car, so I will never need massive rear camber for racing tires) the left side sat at -1.3* max camber (I adjusted it to -0.6), and the other side was maxxed only at -0.9. I sat both sides at -0.5 after assembly of the suspension (not quite fully settled) but I was in a quick hurry to get it close for now. I will set it percise tomorrow morning when I have more time as well as set the toe again. A qcik test drive around a few blocks and up to speed (about 70mph with a few jiggles left and right, and a hard stop) and then put in back into the garage for a quick double check- the left settled to -0.6 and the right is at -0.9. Ill reset them tomorrow to -0.5 and set toe to 3/32in I hope as long as I still have adjustment range with toe.

    All in all the install went pretty quick other than having to drop the subframe to drill the inner mounts to 1/2". Sorry, no pic because like a dumb ass I hiked up to Azusa Canyon "Bridge to Nowhere" and jumped into the river to swim forgeting I had my GoPro in my pocket without the waterproof housing on it. Expensive mistake, but fun day.

  4. #129
    Senior Member
    Join Date
    Apr 2006
    Location
    Europe
    Posts
    752
    najs write up Vetruck.
    when will you start doing the adjustable toe-links purchase?

  5. #130
    Moderator
    Join Date
    Aug 2012
    Location
    SoCalif
    Posts
    1,011
    Quote Originally Posted by kowalski View Post
    najs write up Vetruck.
    when will you start doing the adjustable toe-links purchase?
    Ill check the toe tomorrow. I think I still have enough factory adjustment, but if I do not I am NOT messing with new tow arms, I will instead do Kmac eccentric rear control arm bushings to bring the bottom back a little so the fron toe arm is in spec adjustment range again. Ill keep you posted on results.

    I just got off the phone with the misses, she reports the car drove very very nice and she ecould take her hands off the wheel over the road seams that were yanking it around prior to today. I just had too much rear camber and the inside pointed tire edge was seating into the road seams and tugging the rear end of the car everywhere making unwanted steer when you hit them. Not anymore. The tire is much more flat now and bridged the road seams rather than catching them. I want to get the car out by myself and really run it hard around some 60 mph+ freeway cloverleafs and check the roll and balnce on it now that the rear is in better alignment spec.....then go from there whether I will go swaybars or not- Hoping not to, but I may need to lock it up more if the car is still roling bad.

    The exhaust will be coming up soon on the agenda in the next few months. Once I do this, I will bridge the two rear control arm mounts with a spreader bar and solid rod ends (non swivel type) by simply inserting longer control are bushing studs and mounting the spreader bar to the back side of the mounts. The exhaust is in the way right now or I would do that immediately. Have a strong feeling I am getting alot of flex there and do not want to crack it. I will also later weld a sloid metal brace across the subframe above the tabs also- since that is simple for me to do. That rear subframe is flimsy when I unbolted it from the chassis.

    ps- I have a few serious issues with two other cars that i had to again kindof put projects on this car on hold. I was going to do the body next but funds are diverted to the truck rearend and tires and new battery for another car. There just went a couple grand-Always something.
    Last edited by Vetruck; 08-17-2013 at 03:10 PM.

  6. #131
    Senior Member
    Join Date
    Apr 2006
    Location
    Europe
    Posts
    752
    when lowering the car with aftermarket springs and sporty shox like i did, does standard factory toe-links give enuff adjustability for toe-in on w202 cars?

    what kind of improvement vs factory toe-links do we get with adjustable aftermarket links?
    do they provide a wider adjustability vs standard rods?

    how is the response (improvement) with aftermarket toe-links in sporty streetuse drive, do we get more stability in straightline driving or car will handle better on twisty curvy roads, better stability in high speed driving?

  7. #132
    Moderator
    Join Date
    Aug 2012
    Location
    SoCalif
    Posts
    1,011
    Kowalski, the factory toe links are a very solid design. Going aftermarker would not gain anything in stability or performance. As for adjustment range, every car is slightly different as per build tolerences so most could be fine, but some could have issues with lack of adjustment. just depends on how low you go, as well as has the car ever been in an accident and slightly tweaked, etc.

    As I stated above, now that I have studied the car well and have been tinkering with it the last few months, I have come to the conclusion that I would never bother changing rear toe links-WHY? becasue as stated they are plenty strong. What I would rather spend the money on is new KMAC eccentric rear control arm bushings- for two reasons. 1) takes out more of the lateral flex when you replace the crappy OEM rubber bushings, and 2) by bringing the bottom control are inward just a tad, you regain more adjustment range of the OEM toe links.

  8. #133
    Senior Member
    Join Date
    Sep 2011
    Location
    MD USA
    Posts
    178
    first i just want to mention that this install does not take 45 min like someone here mentioned. I took me 2 hours just to do one side, and is not because this is my first time working on suspension. the DIY part of this threat and in this forum in general are horrible (not to insult anybody). besides SD202 (Thank you) nobody took the time to take some pictures of how everything is installed, on which side the washers go and how to adjust the camber after you installed them? I have not done the right side and hopefully i will finished it tomorrow and take some pictures of how to take apart everything and how to put everything together. now how in the world do you adjust camber with this things, do i have to take the wheel off all the time to adjust it? Also when i try to turn the yellow rod it is very difficult to turn. also what are the bolts on each site for what is their purpose?
    Last edited by thegame; 10-29-2013 at 03:25 PM.

  9. #134
    Senior Member
    Join Date
    Sep 2011
    Location
    MD USA
    Posts
    178
    My first DIY instructions
    the installation. tools you will need a ratchet an extension a 17mm socket a 17mm open end wrench and two 19mm wrenches (preferably one of them with a 19mm ratchet mechanismClick image for larger version. 

Name:	IMAG0064.jpg 
Views:	62 
Size:	98.2 KB 
ID:	1724).
    ok first use wd40 on both ends of the camber arm. remove the far end bolt and nut (it is the most difficult of the two). use the fixed 19mm wrench to hold the nut and the 19mm wrench with the ratchet mechanism to move the bolt Click image for larger version. 

Name:	IMAG0051.jpg 
Views:	71 
Size:	38.6 KB 
ID:	1725. after the nut gets untightined and fall off use a jack to raise the hub a little so you could remove some of the stress of the 19mm bolt this way the bolt can be push out easyClick image for larger version. 

Name:	IMAG0070.jpg 
Views:	66 
Size:	57.9 KB 
ID:	1726 I know i missed spelled weight.
    after removing the 19mm nut go to remove the 17mm nut and bolt. use the open end 17mm wrench to hold the nut and a ratchet an extension and a 17mm socket to remove the nut and the bolt.Click image for larger version. 

Name:	IMAG0057.jpg 
Views:	68 
Size:	60.6 KB 
ID:	1727
    now you should be able to wiggle the camber arm up and down. to remove the arm complete spray wd40 on the hub bolt and wile wiggling push against it this should get it free. the arm will look like thisClick image for larger version. 

Name:	IMAG0071.jpg 
Views:	69 
Size:	78.1 KB 
ID:	1728
    spray wd40 on the silver sleeve and push it out until it gets leveled with the arm then use the 19mm bolt to push it though the hole
    Last edited by thegame; 10-31-2013 at 05:09 PM.

  10. #135
    Senior Member
    Join Date
    Sep 2011
    Location
    MD USA
    Posts
    178
    spray wd40 on the silver sleeve and push it out until it gets leveled with the arm then use the 19mm bolt to push it though the holeClick image for larger version. 

Name:	IMAG0075.jpg 
Views:	70 
Size:	47.7 KB 
ID:	1729,Click image for larger version. 

Name:	IMAG0076.jpg 
Views:	66 
Size:	54.9 KB 
ID:	1730
    now put together the adjustable arm use a lot of grease. also on the yellow tube, one end is a little squared off use that end for your hub end (i'm not 100 % sure on this one but is what i did) it makes it easy to adjust.Click image for larger version. 

Name:	IMAG0080.jpg 
Views:	85 
Size:	52.8 KB 
ID:	1731
    then install in reverse Click image for larger version. 

Name:	IMAG0082.jpg 
Views:	87 
Size:	53.4 KB 
ID:	1732
    this is why i think you should put the squared end towards the hub make it easy to adjutant (again not 100% sure)Click image for larger version. 

Name:	IMAG0085.jpg 
Views:	87 
Size:	49.3 KB 
ID:	1733

    Disclaimer: I don't not take any responsibility or damage to your vehicle, you or anybody that uses this DIY/tutorial. the reader is using it at their own risk. This is just to help others
    Last edited by thegame; 10-31-2013 at 05:10 PM.

  11. #136
    Senior Member
    Join Date
    Dec 2006
    Location
    Norcal
    Posts
    2,864
    Vetruck, I thought in NASCAR they only made a left turn unless spun out.

  12. #137
    Moderator
    Join Date
    Aug 2012
    Location
    SoCalif
    Posts
    1,011
    Quote Originally Posted by RemoLexi View Post
    Vetruck, I thought in NASCAR they only made a left turn unless spun out.
    Why are we discussing this?

    SInce I am here I will attach a picture of my soild racing lionks installed. They are 100% noise free as expected and already have over a 1,000 miles on them)
    Attachment 1734
    Last edited by Vetruck; 11-01-2013 at 07:47 AM.

  13. #138
    Senior Member
    Join Date
    Dec 2006
    Location
    Norcal
    Posts
    2,864
    Not sure it was necessary for u to be that rude to Brabus202. Club202 members should not feel as if one was valued higher then another.

    Member Brabus202 created this thread long ago in order to help our community. I don't know what beef you have with him in other threads.

    Mods may let this kind of bahavior slide, but trust me there's nobody choosing which member to keep or ban based on brag posts.

  14. #139
    Moderator
    Join Date
    Aug 2012
    Location
    SoCalif
    Posts
    1,011
    ...
    Last edited by Vetruck; 01-19-2015 at 09:37 PM.

  15. #140
    Senior Member
    Join Date
    Dec 2006
    Location
    Norcal
    Posts
    2,864
    I don't think this forum will run dry without your nonsense. Enjoy your C220.

  16. #141
    Senior Member
    Join Date
    Sep 2011
    Location
    MD USA
    Posts
    178
    this guy is an asshole man. I don't know if anybody here noticed but vetruck does like to brag about him been a nascar driver and a suspension know it all. In every thread you read he has to say it. or how he teaches people, how to drive high end cars. Get off your high horse body.

  17. #142
    Senior Member
    Join Date
    Dec 2006
    Location
    Norcal
    Posts
    2,864
    The guy is all talk. Though the information he overwhelms you with may seem like he knows what he is talking about- if you dissected it, it's all bullshit.

    You simply can't say a single wrong word to the guy without him blowing up trying to prove u wrong. F that. Old codger.

  18. #143
    Senior Member John Jones Jr.'s Avatar
    Join Date
    Apr 2013
    Location
    Ireland
    Posts
    829
    Yeah, at first I was always interested in hearing what he had to say, mainly on shocks & springs, plus it's always good to have the opinion of a 'pro' on any aspect and especially when modifying. Reckoned I might learn a bit from his input and maybe I did but I got say his posts were hard work to follow and lacked empathy, and empathy is a basic requirement for a 'pro' to have when explaining something or teaching something. He seemed to be on his high horse a lot too, which is a shame as there's no need for it. The bragging didn't didn't endear him either, a big ego compounded with arrogance along with a short fuse do not make good reading or encourage communication on a normal level.
    JJJ.

  19. #144
    Senior Member
    Join Date
    Dec 2006
    Location
    Norcal
    Posts
    2,864
    Well I'm glad I'm not the only one here who was annoyed with him.

  20. #145
    Senior Member John Jones Jr.'s Avatar
    Join Date
    Apr 2013
    Location
    Ireland
    Posts
    829
    No, you're not on your own. No doubt he has pissed off people on other forums too.
    JJJ.

  21. #146
    Senior Member
    Join Date
    Dec 2006
    Location
    Norcal
    Posts
    2,864
    I can only imagine how far the bullshit stinks.

  22. #147
    Senior Member
    Join Date
    Dec 2006
    Location
    Leesburg, FL
    Posts
    219
    Wow I'm gone for a couple of weeks and look at all the fun I missed. This is a very informative thread.

    Keep in mind one major flaw with this modification. The supposed "strength" of Vettruck's parts is total overkill. Even the parts we are using are stronger than the stock arm. The stock part is designed to bend in a collision, to help protect the subframe and mounting points. We have removed this protection. Making this modification with even stronger parts is a waste of money.

    You should inspect this part every few months. These are "hot rod" parts, not the stock 100K items.

    If you want suspension info from real racers, check out Grassroots Motorsports.

  23. #148
    Senior Member anf6789's Avatar
    Join Date
    Jul 2006
    Location
    Philadelphia/South Jersey
    Posts
    1,547
    2014 Black Sapphire BMW 328d xDrive
    1997 Brilliant Silver C36 AMG 183k miles (SOLD)
    1994 Spruce Green C280 176k miles (SOLD)
    Drexel Business '11


  24. #149
    Junior Member
    Join Date
    Jan 2014
    Posts
    3
    do we leave the front alone?

    as far the toe on the rear, did i understand it right that it will not affect toe with this DIY camber kit?

  25. #150
    Senior Member
    Join Date
    Mar 2011
    Posts
    242
    Quote Originally Posted by RemoLexi View Post
    Not sure it was necessary for u to be that rude to Brabus202. Club202 members should not feel as if one was valued higher then another.

    Member Brabus202 created this thread long ago in order to help our community. I don't know what beef you have with him in other threads.

    Mods may let this kind of bahavior slide, but trust me there's nobody choosing which member to keep or ban based on brag posts.
    Hello everyone, for the record I don't have any "beef" with anyone, and i didn't even read when he wrote so it doesn't matter. Ive been working on a M104 swap in my w201 so ill be on here a little more often.
    1986 201.034 5-speed, Evo II wheels
    1986 201.024-w/ 3.2 M104 engine, 5-speed Conversion

Posting Permissions

  • You may not post new threads
  • You may not post replies
  • You may not post attachments
  • You may not edit your posts
  •